
|
Bead Painting from a PhotographBead Embroidery 201
You can make a bead painting by transforming a photo into your own piece of bead art. Here is a complete demonstration of taking a photograph and turning it into a piece of bead embroidered art, complete with easy step-by-step instructions and hints to use along the way.
Hint: When you are taking the photo, make sure you try some photos without the flash. I generally find that the flash photos look flatter and the natural light photos have better highlights to show off the roundness of objects. Step 1: Use Graphics Software to Get the Picture the Way You Want It.For my picture, that first meant correcting a tiny tilt that I didn't care for. I opened up Photoshop Elements 2 (but most any picture editing software should give you similar tools). I used the Rotate command to rotate the picture 1 degree to the right. When I am trying to square some line in a photo to vertical or horizontal, I guess how far off I am and rotate the picture by that number of degrees. Then I check by making the photo window smaller; as I drag the edge of the photo window across the photo, I can see if it meet the line straight or at an angle. If I am still a bit off of square, I make another adjustment. Money-Saving Hint: Photoshop Elements is really simple to use and contains all the stuff I need to play around with a photos that I want to turn into a bead painting. It also does everything I need to work with photos of my finished beadwork. I have an old version of Photoshop Elements on my old memory-impaired computer and it works great. I also have a newer version of Photoshop CS3 on my newer computer and it works fine, too, but it contains a lot of stuff I don't need -- which can make it harder to find my way around in the program. If you don't already own some graphics software that you like, I recommend Photoshop Elements.
At this point I will usually experiment with adjustments to brightness and to contrast. In my experience, my own photos will often benefit from moving a bit in these directions. On the other hand, I recently took some photos of stained glass windows and they looked better darker and with less contrast. So play around a bit and find what pleases you. HINT: When you have made an adjustment that is not quite right, it is a good idea to Undo or Cancel your previous adjustment and do the new adjustment. Each time you rotate a picture, for example, you are rearranging the pixels in your original photograph and losing a teensy bit of the coherent structure of your original. It is better to do that once for rotation than to do it 12 times before you get it right. Most photo-editing programs allow you to simply return to the previous version of your picture. And you may be able to see some changes in a separate window before you apply them to your main picture. HINT: Another good idea is to save several versions of your picture as you are playing with it. And always save your finished picture with a different name from your original picture, so you don't overwrite your original. Step 2: Posterize to Create the Base for Your Bead PaintingUsing the Posterize command converts the picture into areas of color that look a bit more abstract (and use fewer colors) than the original photo. I find this makes my color choices while beading easier. Give it a try and see how it works for you. There will be a choice of levels within the Posterize feature and you can play around to find the setting you like best. For beading, I most often use 4 or 5 for still life pictures, but may use a considerably higher number for faces. My general rule of thumb is to use the lowest number that pleases me. Step 3: Crop to Desired Size and ShapeI crop the picture and then check its size. I want my finished picture to be 300 dpi. If I have a specific finished size in mind because I already know how I want to mount the picture, then I will set either the height or width to match my desired finished size, leaving the other measurement larger than the desired dimension. I'll study my picture and crop the dimension that is too long, until I have it right. Then I'll save a new version of the picture. Step 4: Print Your Edited PictureI suggest you print two copies of your planned bead painting on good quality paper. A lightweight photo paper is ideal. A good quality paper made especially for inkjet printers will also work well. Make sure that if you are using glossy paper that the printer is set for that sort of paper. I suggest you print two copies on the same type of paper. If you print on regular (kinda heavy) photo paper, the print will look fine, but it will be harder to punch the needle through than if you can find a lighter paper that still gives you a great print. Being someone who prefers easy to hard, I prefer the lighter paper for my bead painting work with embroidery. Use your printer's setting for the "best" quality. My HP printer calls this Presentation Quality, but your printer may call it something else and that's okay. Let the printed copies dry overnight. Step 5: Back the Printed Picture with FabricUsing a dry iron, iron woven fabric onto the back of your pictures. Trim the margins fairly close to the edges of the pictures. I usually give myself about a half inch margin at this point. You could also glue your picture to a woven backing, but I worry that I am going to increase the stiffness and make it harder to get my needle through the picture. If gluing appeals to you, try some experiments with different glues -- and please share the results with the rest of us! Step 6: Choose Your Bead Colors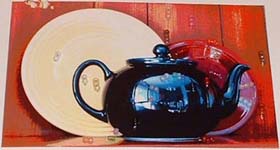
Take one copy of the picture and study it, while also studying your bead stash (or bead catalog). I usually work on one color group at a time, but that may have as much to do with my bead storage system as anything else. When you find a good match for a particular area of the your bead painting, sew a bead or a few beads into the center of that area as a reminder. You may wish to thread a second needle and make a color chart for yourself with color numbers or other written notations plus a few beads of the color you have selected. This is especially useful if you are using a lot of colors. Very tiny color areas (less than half a bead wide) will be impossible to bead, so just ignore those colors. You may decide to use beads that are a bit different than what you see on the photo, and that's okay, too, but that is where having a good record of your thought and plans will be very helpful as you are actually doing the beadwork. If there are two or more similar colors in the background, you may choose to eliminate one color and just simplify the background. For this bead painting, I have wandered from the printed colors at times, so having a bead reference is going to be a big help. In this case, I did not wander from the printed colors for any artistic reasons, but just because I thought that the beads I already had on had would work well enough that I didn't need to buy more beads for this project. If you do a number of pieces of pictorial bead art, you will find that your bead stash grows nicely in the direction of your chosen subject matter. For example, I have lots of colors that serve me well in depicting the colors of faces -- but not so many for the colors of Fiesta Ware!
You could also convert your picture to grayscale by using your handy graphics program or just by printing on a back and white printer. Then you can use the grayscale colors (Miyuki makes a nice assortment of gray seed beads) or use a different color in which you have a good range of light to dark beads. Step 7: Start Beading!If you haven't done backstitch before, you can find
bead embroidery instructions here
and get going. I suggest that you start your beading with the line that you want to be clearest and best defined. This is often at the spot of highest contrast in your bead painting.
In less important areas of the picture, fell free to ignore details. Your picture, even after you have posterized it, will contain more detail than you can convey with beads. Here I am using contour beading to emphasize the roundness of the teapot. I started beading the body of the teapot with the outside edge, then worked my way inward. You can see that I had to ignore a lot of tiny details in the reflections on the pot, yet the reflections I could do help give a sense of roundness to the object.
Hint: when you know the level of detail you want in an image, it can be helpful to print out your picture in several different sizes and try putting some beads in front of the picture to see if that level of detail is really possible with that size picture. Then you can adjust your picture size according to your results.
As those of you who have looked around this website have already guessed, this bead painting is destined to be mounted on one of my many spare mint tins, so I have rounded the corners to fit the top of the metal box. Step 8: Mount your beadworkYou may wish to brush a thin coat of fabric glue or acrylic medium over the back of your bead embroidery, as a safety measure to hold everything in place. However, be very sure that you have finished any editing of the beadwork before you go sloshing glue on there, as it will complicate your efforts of make changes in your work. Now it really depends on what you will do with the finished work. If you are gluing the beadwork to a backing (box, purse, suede, whatever) I suggest trimming the work at this time. Be very careful not to cut any beading threads as you trim your work. After you glue the bead painting in place (and let it dry completely) you may want to cover the edge with picot trim or another bead or non-bead trim to finish your bead painting. If you are going to frame the work, then you probably do not want to trim your bead painting. Mount it to a hard backing in your desired size and mat it before framing. An easy way to do all of this is to take the completed bead painting to the framing store and put their advice and experience to good use. You can find more ideas for framing beadwork
here
From Bead Painting to Bead University Page
|
 My bead painting starts with a digital photo that I have taken of some dishes in the hutch in my dining room. I played around with different compositions of stoneware from the hutch until I came up with this one.
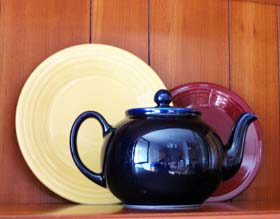 This step is also a good time to make adjustments in the quality of the photo. Photoshop Elements (and Photoshop, too) have a miraculous command called Auto Levels and I don't fully understand how it works, but it improves the look of most of my photos, so I use it early on with most pictures, and if it doesn't look better than the original, I simply Undo it.
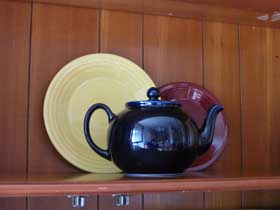
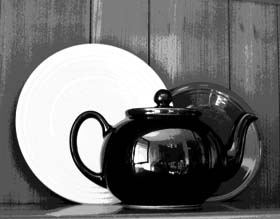 Hint: If you have a nice bead stash and just cannot match whole areas of color, before you head for the bead store, consider going back to the computer and altering the colors in your picture. Most graphics programs will have one or more ways of changing the balance of colors so you can make your picture greener, for example. Or redder. Or whatever.
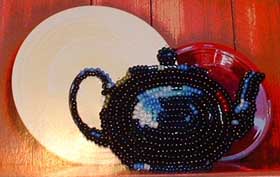 Sometimes I have a skinny line or small area of detail that is important to my subject matter, so I'll start with that. It might be a pair of glasses, the eye of a cat, or In this case)the handle of a teapot. I'll work that area in smaller beads if I need to, to get the effect I want.
 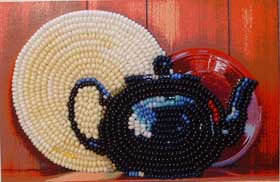 The plates in this bead painting get the same treatment of contour beading, starting at the outside and working my way in. If it had been important to demonstrate that the plates were Fiesta Ware, with their well-known ridges reflecting the light, I would have needed to either work the plates with smaller seed beads that these size 11s -- or I could have made the whole picture larger.
 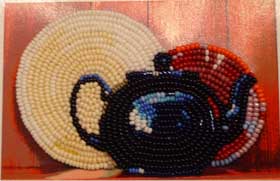 The beading continues with the reddish plate, again beginning at the outside edge of the plate and working my way in toward the center. There is a bit of a glare from the photo paper here that distorts the background colors some, but you can still see the progress of the beadwork.
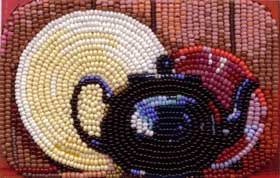 On the background, I have used size 11 seed beads for everything except the dark vertical lines, which are transparent matte dark brown size 15 beads. Well, okay, there are a few size 15 black beads in the shadow of the red plate, too.