|
Framing Beadwork
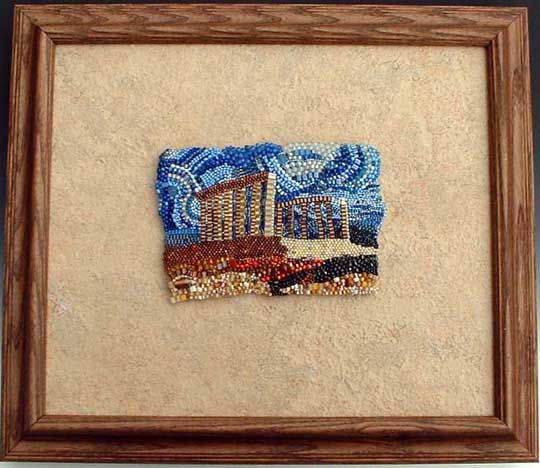
Framing beadwork was a puzzle to me. When I had completed my first piece of art in brick stitch, the Temple of Poseidon at Sounion that you can see here, I could not figure out how to go about framing or mounting it.. I was talking to a friend who used to manage a frame shop, and she suggested that I get a hunk of stone from a shop that cuts stone and then mount the beadwork with Velcro. I never found that hunk of stone, but I found a stone-like ceramic tile to use as a background for my beading. The tile was 12 inches square, so I went with the 12 inch width and then cut a couple inches off the height, using a tile cutting rig I bought at Home Depot. I had my local frame shop (at Michael's) make me a simple walnut frame and they secured the tile in the frame. The woman who took the order at Michael's had seen the beadwork when I brought it in, and had helped pick a frame that would set it off nicely. But the guy who was there when I picked up my framed tile was a little puzzled about why anyone would hang just a plain tile on the wall. While the frame shop was at work, so was I. I sewed the loopy side of Velcro over the entire back of my beadwork. As it turns out, Velcro is tough to sew; it is somewhat difficult to push the needle through and it eats thread. The thread shreds pretty fast, so I learned to work with fairly short lengths. Eventually, I had the piece mounted to the Velcro in enough places that it didn't get all droopy. I fastened the Velcro-backed piece to the hooks side of the Velcro before applying glue to any surface. I carefully centered the piece on my framed tile. I used Post-It notes to show myself where I wanted to mount the piece.
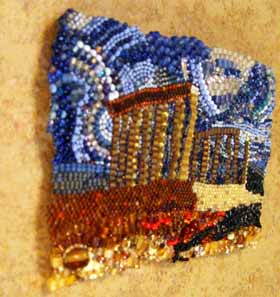
The Velcro elevates the work off the backing a bit, to good effect. The top photo doesn't really show this, so I took this picture from a side angle so you can see the elevation and the shadow. More Advantages of Mounting with VelcroThis method of mounting also allows for possible future changes and repairs. If (gasp!) a thread in the original beadwork broke and beads started sliding off the picture, I could separate the two sides of the Velcro and have better access to the beadwork for repairs. And if I needed to, I could totally remove the Velcro from the beadwork. It is always my hope when I create a piece like this that it will be displayed and appreciated for decades to come (maybe even for centuries!) so I want to make it easy to care for. I have imagined my pieces suffering from smoke damage or just grimy conditions, and the beadwork needing to be cleaned. Being able to remove it from the tile or mat board, or whatever crazy thing I've mounted it on should make the job easier. I probably shouldn't admit this, but when I was working on ideas and stitch and color samples for a beaded goblet, I put the tiny little cordial glass I was using for my experiments through the dishwasher a couple of times, just to see what would happen. It came out fine, but you have to wonder what would happen if some of the beads had been dyed. . . . Other Mounting Methods I Have Used1. Sewing the bead art to a foam core board. I have only done this once, and I'm unlikely to do it again, but it worked okay. Except that after I had mounted it, I decided that I had picked the Wrong Color board to best show off the work. 2. Gluing the beading to the mounting surface. Thus far, I have only done this with smaller pieces, or jewelry-size pieces not meant for framing. I have not mounted any pieces intended for framing and selling. This method is extremely efficient, so I may change my mind about how often to use it. Framing Beadwork: Selecting BackgroundsIn addition to tile and foam board, I have mounted beaded pictures on regular mat board and on atmospheric painted backdrops I have created for them. For one picture of a Greek temple I painted a sky similar to the one in the picture and mounted the beadwork in the middle of it. For bead-embroidered portraits of Gandhi and Mandela I painted sunsets and mountains on canvas. As you consider options for framing your beaded pictures, consider how it will hold up over time and how it will affect your beads. I try to avoid dyed or galvanized beads in works of this sort, but I could be mistaken about some beads that are already in my stash. So I try to use acid-free "archival" mounting materials when I can. You can find "archival" quality in both foam board and mat board. What about Glass in Framing?So far I have chosen not to use glass when framing beadwork because I love the tactile quality of the beads and I think that is more important than proving the additional protection that glass could offer. But that is a personal and stylistic choice. You might decide that a nicely framed and glassed piece is how your beading looks its best. Or you may be making a piece for a setting that is dusty, or where a million kids a day would touch the beads with their tiny peanut-buttery fingers, or you may be making a piece for a hospital setting where nothing is allowed that could collect and hold some possible infectious agent. If you haven't framed a chunky object before -- or even a slightly chunky one like beadwork -- you may not know that frame shops and framing catalogs have various components available to put between your mounting mat board and the glass, so the glass can appear to float above the beads. You just need to choose a frame that is deep enough for your whole assembly and that has enough of a lip over the edge of the glass to hide the extra hardware that lets the glass float. Framing Beadwork InexpensivelyTake your beadwork with you to a store that sells ready-made frames. Do this before you mount your work on a backing. See how your work looks in standard frames and standard frame sizes. Try out frames that seem too big, and see if they make the work look great (or just lost). Try out smaller frames than you first imagined. Be open to the possibilities. If you find a good combination, snatch it up and choose your mounting surface to look good with your work and your selected frame. You may even find suitable frames in your own attic, basement, or garage. There are often lots of frames at garage sales and flea markets (many containing artwork). If you are really, really thrifty and ingenious, you might start with a nice frame in mind and design a work to go in it. However you do it, show off your work! Hang it up, enjoy it yourself -- or put it in places where you can sell it if you wish. Or give it as a gift, framed and ready to hang.
For another way to mount your beadwork,
take a look at this wood teapot with bead embroidered pieces mounted on two sides.
Return from Framing Beadwork to Bead Art page
|

 When I was satisfied both with the placement and with my markers to get it back to the right spot again, I took the bead-Velcro assembly off the tile and put glue on the back of the Velcro. I placed the piece carefully in its marked spot, applied some pressure to get a good bond, and removed my Post-Its.