|
Kids Class 1 -- Memory Wire Bracelet
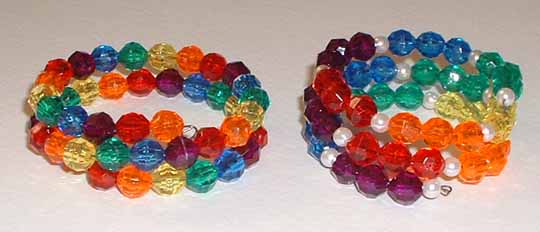
Materials Needed for Each Student to Make a Memory Wire BraceletName Badge -- Well, if they are your own kids, you can probably skip this item. Felt piece to use a as work surface Bracelet size memory wire in 3-loop sizes, with stopper-loop already formed at one end 8 mm faceted plastic beads in primary and secondary colors (I bought my supply from Enterprise Art) Seed beads for spacers: I used black, white, some mixed color "bead soup" and some small plastic pearls. Tools and teaching aidsMade-up sample bracelets Trays or bowls for dispensing the beads (I used one for each color) Needle Nose Pliers for finishing bracelets Samples of our next project Preparation for the ClassMemory wire comes in long spirals. I cut the wire into 3-loop segments at home, using the heavy duty household pliers from the basement workshop, NOT my regular jewelry pliers. I used the household needle nose pliers to make a loop on one end of each cut piece, so the wires were ready to use. If you look closely at the picture above, you can see the loops. It is important to get the cut end bent far enough around so it will rest against the first bead; you don't want a tough wire end to catch at clothing or skin! Memory wire is extremely tough and will ruin your regular jewelry cutters and pliers. There are now special cutters for memory wire which you can use, or just use the household tools. Either way, you will need to apply some force for both the cutting and the bending. Getting Started in ClassThe 16 girls in this class all knew each other from the after-school program, but I had only met a few of them when I came over to make arrangements about teaching. So I had each wear a name tag and asked each to say her name and tell what grade she was in, and to name her favorite color. I wanted to know about favorite colors to guide me in selecting materials for later classes. Designing Sequences of BeadsI talked about the idea of having a repeating pattern in the bracelets and showed memory wire bracelet samples and talked about the simple repeat patterns in them. Then I set the girls loose on the beads and most of them made several bracelets, although some used mostly seed beads, so they progressed more slowly. Finishing a Memory Wire BraceletAs each bracelet was completed, I used those handy household pliers to make the loop to hold the beads on the bracelet. The 8 to 12 year old girls didn't have the strength to do it, but if you are working with older kids, you may find that at least some of them can handle the task (and save your wrists). Ending the ClassWe cleaned up all the supplies and packed them away, then I showed samples of the next project,
Crystal Necklaces.
Return from Memory Wire Bracelet to Free Beading Projects for Kids
|

