|
Using Brick Stitch to Create Seed Bead ArtBrick Stitch 100
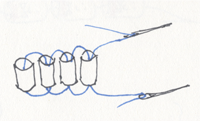
If you are already familiar with brick stitch, you know that it is usually used to create a pattern of rows of beads, each row offset from the one below it, just like bricks in a wall. We're not gonna do that. This is brick stitch on vacation from the humdrum life of lining up in orderly rows. If you want to join in the fun, you've come to the right place. Let's start with the basics. This stitch starts with a ladder of beads stitched to line up their solid sides next to each other. There are several ways to get to that same result. Two-Needle LadderYou could put a needle on each end of a piece of thread and slide the first bead a ways down the thread. Then use both needles, coming through the hole from opposite directions, to put the next bead on and snug it tidily next to the first bead. You can add each additional bead using the two-needle dance. When your ladder of beads is your desired length, remove the needle from the shorter end of thread and tie the two ends together to stabilize your ladder.
One Needle, One Bead at a Time LadderTie a stop bead 6-8 inches from the end of your thread. Put two beads on the thread then bring your needle back around to the first of your two beads and go through both beads. When you tug on the thread, allow the two beads to snuggle next to each other. Add the next bead to the thread and snuggle it next to the previous bead. Bring the thread through the previous bead and then through the bead you just added. Continue adding beads, each time putting the new bead onto the thread, snuggling it next to the previous bead, and locking it in place by sewing first through the previous bead and then through the most recent bead, so your thread is available for adding another.
One Needle, A Bunch of Beads Lining Up
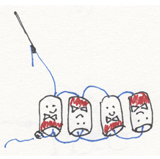
Tie a stop bead 6-8 inches from the end of your thread. Use your needle to pick up as many beads as you think you want for your ladder. Think of them as a bunch of lazy clown dolls that are now lying end to end along your thread. Your job is to get them to line up right next to each other and, because they are clowns, they will line up with every other one standing on his head instead of his feet! Use your needle to weave your way back down that line of clowns. . . or beads. . .picking up each one and cozying it up to the one beside it. Tie a knot near the last bead hole and you have your ladder of beads. Okay, let's do brick Stitch!Once the ladder is out of the way, the main construction method uses thread to create a structure like knitting. But don't worry, you won't need knitting needles for this! Start the row above your ladder by picking up two beads, then using your needle to go under the first available loop of thread that is already there in your ladder. Thread your needle back up through the most recent bead, then pick up one bead and catch the next loop from the row below. As you continue in this way, you are creating a nice even structure.
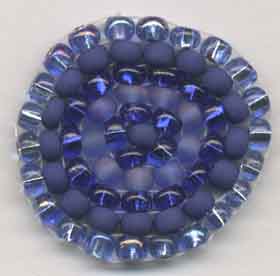
Now let's play with the structure. Notice that you can pick up more than one bead, or a larger or smaller bead, and change the line of your row (and of the rows that will follow it). You can make a partial row or change bead sizes within your row. This is how you can manipulate lines in your artwork. If you work with varied sizes of beads, they will not always line up neatly near the very next loop of thread on the row below, so you will have to decide which loop to connect to. Sometimes neither of the two nearest loops are very close, so I go down the nearest bead hole and loop around a thread from a lower row before coming up that some bead hole and back through my most recent bead. Making CirclesNow that we are playing with line and structure, make a new ladder with just enough beads to pull around into a circle, with thread loops facing to the outside of the circle. (The sample of circular brick stitch shown below starts with a single bead at its center. I've gone around through the hole a couple of times so I could pull a loop of thread to each side of the bead, then started my first circle of brick stitch, attaching each bead to the loops around the initial bead.) Go back through the first bead to finish the circle structure, then start adding a new row of beads around the circle. You can connect each bead to the thread structure wherever it makes sense and keeps the structure going in the shape you want. You will probably have more than one new bead tied into a thread loop from the previous row, at least some of the time. Unless you use bigger beads for each round. . . .
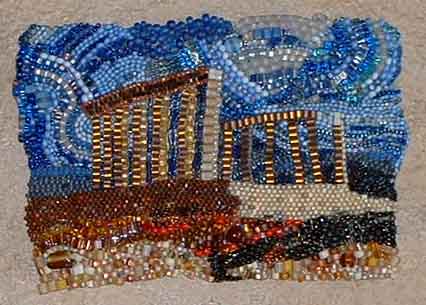
Interpreting a picture in brick stitchIf you haven't done brick stitch before, you may want to try our kinda simple projects to get the sense of it into your fingers before you go on to a larger picture, but when you are ready, go for it! Draw a picture, pick out a favorite vacation photo, or just study the picture below.
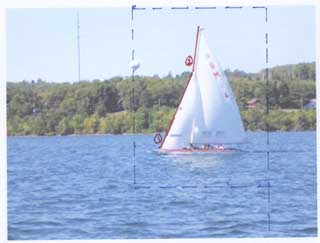
Notice where the strong lines are, and which area have more broken up lines or textures. Pick one of the strong lines to be a ladder that begins your work. This is likely to be a line with strong contrast. You are able to have more than one ladder in a work, but pick the first one. If that line marks the division between two blocks, which color is the most definite? If someone had given me the snapshot above and wanted a "portrait" of their sailboat based on the photo, I would first crop the photo, roughly along the dotted lines I have drawn below. Then I would plan to start beading at the high contrast line between the sail and the sky. I have drawn a red line there and a number 1. After I had beaded the fore sail, I would continue up the mast (more red line and the number 2). Then I would bead the main sail. I would probably work the sky mostly in horizontal stitches and the trees mostly vertical. The water and the hull of the boat would be in horizontal stitches.
SUscribe to "What's New at Seed Bead Smarts" by Email
|

