|
Six Beaded Cabochon Brooches
Beaded cabochon brooches had been on my mind with the idea of making some as Christmas gifts. So here are six variations of simple (but extremely sparkly!) beaded cabochon brooches. I had this idea to make caramel corn as cute little Christmas gifts, then I realized that if I added peanuts, it was a lot like Cracker Jack, so I thought I should add a prize to each container. . . . So I was looking to make my own Cracker Jack prizes. . . . As I was pawing through my box of cabochons, I found these vintage acrylic cabochons, about 35 millimeters wide. We could argue about whether they are really cabochons, as they are not smooth on the top, but are molded into rays that come from the center of the cab. They are flat-backed with a mirror back. They reflect light and show as three different colors, depending on the angle and the light. They show up as magenta or chartreuse or gold at different times, so I wanted to pay attention to all of those possibilities when I chose beads to go with them. I got started by gluing each cab to some suitable backing of leather, suede or heavy nonwoven interfacing, so all the glue could be drying at one time and I would have that step out of the way. I'll talk about each brooch design individually, then cover finishing techniques at the end.
Brooch 1The cab is glued to a piece of hot pink pigskin and a single row of 8mm fire-polished beads with an AB finish is backstitched around the stone. I used a doubled thread of Nymo D to stitch the beads in place, they went back around the circle of beads twice more, just passing through the beads to further stabilize them. This is the simplest beaded cabochon of all. The pigskin, which I bought at a craft store, was a pleasure to bead on.
Brooch 2This beaded cabochon is also glued to hot pink pigskin. It is surrounded by a row of color-lined magenta 4mm cubes, with the holes of the beads radiating out from the cabochon. A row of green fresh water pearls (about 5mm in size) are also stitched directly to the leather, between the cubes and the cabochon. They are backstitched and the tension is just tight enough to force the circle of cube beads into a slant of about 30 degrees off of the flatness of the cabochon's base.
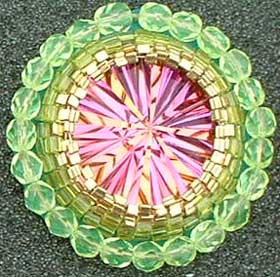
Brooch 3Bright green ultrasuede forms the base for this beaded cabochon. The cab is glued in place, then 3mm chartreuse cubes are backstitched around the base. A second row of the chartreuse cubes is peyote-stitched to the first row, forming the beginning of a bezel around the cabochon. The cube beads are followed by four rows of size 11 gold galvanized triangle beads. These start out being a bit far apart, but as each new row comes around the cabochon, they pull up into a nice bezel. The bezel is surrounded by a row of 6mm faceted crystal beads in a pale green.
Brooch 4This begins with the cabochon glued to some heavy weight white nonwoven interfacing. Then 15mm round transparent gold beads are sewn on in a brick-stitch mode. The thread is brought up from the back right at the base of the cabochon. Then the first two beads are added to the thread and the beads are arranged side by side on the backing, with their little holes sticking up in the air. A stitch is taken through the interfacing then back up through the second bead. A third bead is added, and sewn down, again with its hole facing up. this begins to create a first row upon which brick stitch can be built. Continue around the cabochon, finishing by connecting the final bead to the first, and back into the interfacing. When you bring the thread back up through any nearby bead, you are ready to begin the second row of the project. For my second row, I used silver-lined green delicas. Because it is brick stitch, I was able to add as many beads as I needed to along the line of thread that topped the previous row. This is one of the great advantages of brick stitch: you can play with different sizes or shapes of beads and still make a coherent fabric of beads. The third row is size 11 Japanese seed beads in transparent red with a rainbow finish. I embellished the brooch with five plastic flowers, using the same red beads for flower centers. These are stitched to the interfacing, some nestling down into the valley between the cabochon and the first row of beads and some with a stem of a couple of red beads to get the spacing and dimension I wanted. I think the flowers are a little lost here on top of this beaded cabochon, as the colors are too close to the colors of the cabochon and the the cab is so reflective that anything in front of it has a tendency to disappear (more so in real life than in the photo). But if you make something like this, you will be working with whatever you have in your stash (or whatever you buy for the project) and you will get a different look.
Brooch 5This beaded cabochon brooch starts by gluing the cabochon onto a piece of pale tan suede. I salvaged this suede from a garage-sale suede jacket, and had used other portions of it successfully as a backing for loomed or peyote-stitch brooches. It was great for a backing, but a real pain to stitch through for this project. I had to use my pliers a lot to pull the needle through the suede. But I'm fairly stubborn, and I persevered. I bezeled the cabochon with two brick stitch rows of size 11 light green color-lined seed beads, followed by a row of light green AB delicas. I covered up some of the thread at the top by sewing a row of silver-lined green delicas on top of the brick stitch thread. I surrounded the beaded cabochon with a row of 6mm light green faceted glass beads. Then I embellished with an assortment of glass, crystal, and wire beads.
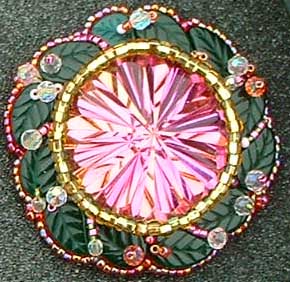
Brooch 6This beaded cabochon began by gluing the cab to a piece of nonwoven white interfacing. Then I glued small green leaf beads around the cab, fitting them as close to the cab as I could. I hid the gaps between the leaves and the cab with a backstitched row of size 10 silver-lined amber seed beads. Then I hid gaps between some of the leaves with short lines of delicas or size 11 seed beads, embellished with a few small crystal beads. I think my one original idea in this whole six brooch project was to stabilize the leaves and embellish them by using the holes in the leaves to add embellishment of small crystals, seed beads, and or delicas. In some cases I came up through a single hole and back down the same hole; in others I created a small loop between the holes of two adjacent leaves. I finished the brooch with a row of back-stitched seed beads surrounding the whole wreath of leaves. Step to Finishing a Beaded Cabochon Brooch1. Carefully trim the backing as close to the outer row of stitching as possible. 2. Glue on a pinback. 3. When the glue is dry, glue a piece of leather, suede, ultrasuede, or even card stock over the back of the brooch, cutting slits for the two ends of the pin finding to stick up through your chosen back cover. 4. When the glue is dry, trim the back covering as close to the stitched backing as possible. 5. You may wish to sign your piece on the back covering, using a fine point Sharpie or a paint pen. Back to Beading Project Main Page
|