
|
Enhance Your Bead PicturesWith Contour LinesBead Embroidery 102
Two bead pictures: On the left is the previous project (Embroidery 101) and on the right is the project for this class. Creating better bead pictures is the next lesson. In this free seed bead project we are taking the drawing and beading technique to the next level to create a different and more realistic style. I recently took a class on drawing with colored pencil at the local community college's adult division. As I was beading the project on creating original bead embroidered pictures (which is shown on the left at the top of this page)I kept hearing the words of the instructor in that colored pencil course. She told us repeatedly "Never use straight lines to color a curved object." She kept reminding us to make the direction of our coloring follow the curves. I used the same basic still life drawing that I made for the previous project. Your bead pictures could use the drawings you made for that project, or make a new drawing following the general instructions in steps 1 through 6 of Make a Bead Embroidered Picture. In case you want to flip between that page and this one, the page will open in a new window. Once you have your picture, have it colored in the way you want, have prepared your beading surface by ironing fabric onto the back of your drawing, and have selected your beads, you are ready to begin beading on the contour. Please see the link in the paragraph above if you need help with any of the preliminary steps. Let's Start BeadingIn this case, we will start our bead pictures with the black outlines. This gives you good experience beading a curved line. In the curviest part of these lines I only put on two new beads at a time, then circle back through the most recent one, so every bead is fastened in place. Where the curves are gentler, 3 or 4 beads can be put in place at one time. Couching and Other Corrections to Your LineIf you have put, say, 4 beads and cannot hold the line where you want to just by going back up through the middle point of those 4 beads, then you can make corrections by couching down the thread between other beads. Couching is an embroidery term and it means to fasten a thread or trim in place by making stitches up from the back of your piece, taking the thread over the trim (in this case, beads on a thread), and take the thread back down through the backing. You can do this in every space between beads, or just where you need to nudge a bead or two into the correct placement. Here's another way to make corrections to bead pictures. If you want to nudge a bead over a little bit, you can come up from the backing and stitch through the single bead, tugging it into place. Of course, you can do the same with multiple beads. Make Your Line BehaveIf the line of black beads is where it belongs, but the beads are falling both ways from the thread, you can strengthen the line by running a thread through the entire line of beads, only attached to the backing at each end of the line (such as the side of a bowl-rim line). You can repeat this step, putting more thread inside the beads, to stabilize them even further, if you wish.
Begin Adding Color to Your Bead PicturesBegin coloring in one of your objects, starting at the line that defines its shape. For the bowls in my picture, I started at the rim and beaded the interior first, then the exterior of the bowl. Notice that at the end of a line of beads, there may be a little wedge that is too small for a bead in the usual position, but you may be able to insert a single bead turned sideways to fill up more of that area. Don't Squeeze the BeadsAvoid the temptation to "just squeeze in" one more bead than will comfortably fit. While it is often possible to squeeze one more teenager into a Volkswagen Beetle, it is not possible to squeeze more beads into a space. Teenagers are flexible and a bit squishy. Beads are not. If you try to fit too many into a given space, they will either push against your nice black line and mess up the shape you have so carefully drawn with beads, or they will pop away from the surface and look messy. Possibly both. Keep an eye out for beads that are thinner than the rest. These are often useful in filling out the end of a line, where there is not enough space for a regular size bead. Similarly, beads that are fatter than the rest can be used to replace two regular sized beads to make space accommodations. Those thinner beads are also handy for putting sideways at the thin end of a long triangle.
Keep Beading Your Bead PicturesContinue filling in your objects, one color at a time. Then begin your background by beading the outside edge and making a really nice line, using the same skills you used to bead the black outlines. Work your way inward until you have beaded the entire surface. Proofread and Correct Your Bead PicturesWhen I checked my piece, I realized that when I started out, the yellow inside of the bowl was very nice and flat, but I had pushed against it with the blue beads in the bowl above it, and the beads were crowding their way off the picture. I removed a few yellow beads from the most crowded areas. I did this by putting a sturdy needle through the bead and using the needle to lift the bead a bit away from the others. Then I broke the bead with my needle nose pliers, Keeping the beadwork away from my face and keeping my eyes closed as I applied pressure with the pliers. I used the needle to push/pull the broken bits away from the beadwork. Then I smoothed the surface, nudging the beads a little with my fingers to get them to lie flatter.
Bead the Box!Since my drawing was already the size of a mints tin, I went ahead and trimmed the work carefully and glued it to the top of a tin. Depending on your choice of glue, you may want to rough up the surface of the tin's lid with sandpaper to provide a better surface for the glue. Read the instructions on the glue you have chosen. Trim Strip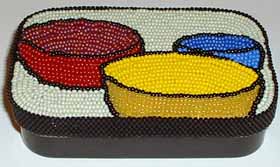
I put a strip of beadwork around the side of the lid, including the side of the beadwork itself. This provided the black border I wanted around the beaded picture. My trim strip was done in delica beads. I could see that it was going to take 7 beads to make the desired width, and there was no way I would voluntarily do a long strip of odd-count peyote. So I did a strip that was six beads wide, and when it was long enough I added a single row of brick stitch to the edge to reach my desired width. I decided that this narrow strip would be a great place to get comfortable with Fast Peyote Stitch, so I used it as a chance to practice a new skill. You may have seen Fast Peyote Stitch in Bead and Button Magazine. You can download the article from their website. You will have to register on their site to do so, but you should probably do that anyway, as they have lots of good stuff there. For the Fast Peyote Stitch article, click here Show Us Your Own Bead Embroidered PictureYou can show us your results, so we can all learn from each other. Whether it's a piece you just did because of what you read here, or if it is something you did in the past that fits into this discussion, please consider sharing it. Return from Bead Pictures (Embroidery 102) to Bead University Page
|

